
Self-Host an AI Agent Using OpenClaw and WhatsApp Cloud API (2026)
You shouldn’t need to pay a middleman just to put your AI agent on WhatsApp — yet that’s the default everyone ends up recommending. After spending days wading through scattered resources, I finally got OpenClaw talking directly to the WhatsApp Cloud API. Here’s the exact path I took.
Self-Host an AI Agent Using OpenClaw and WhatsApp Cloud API (2026 Guide)
Set up a WhatsApp Business number for your AI agent in under 30 minutes — no third-party providers, no ban risk, using official WhatsApp Cloud API
 OpenClaw + WhatsApp
You shouldn’t need to pay a middleman just to put your AI agent on WhatsApp — yet that’s the default everyone ends up recommending. After spending days wading through scattered resources, I finally got OpenClaw talking directly to the WhatsApp Cloud API. Here’s the exact path I took.
In this guide, I am sharing:
- Prerequisites
- How it works
- A Step-by-step Guide
- The resources I used
Prerequisites
You obviously need OpenClaw for this. To install it on your Linux/Mac server, use the following command:
curl -fsSL https://openclaw.ai/install.sh | bash
For other installation options, follow the instructions here.
Meta Developer Account
You will need to register as a Meta developer if you are not already.
Meta Business Portfolio
You will also need a Meta Business Portfolio. If you don’t have one, you can create it on the Meta Business Suite.
Public Domain Name
You will need a public domain for WhatsApp to send callback requests to OpenClaw.
How It Works
The diagram below shows how the different services communicate with each other while keeping your local server secure.
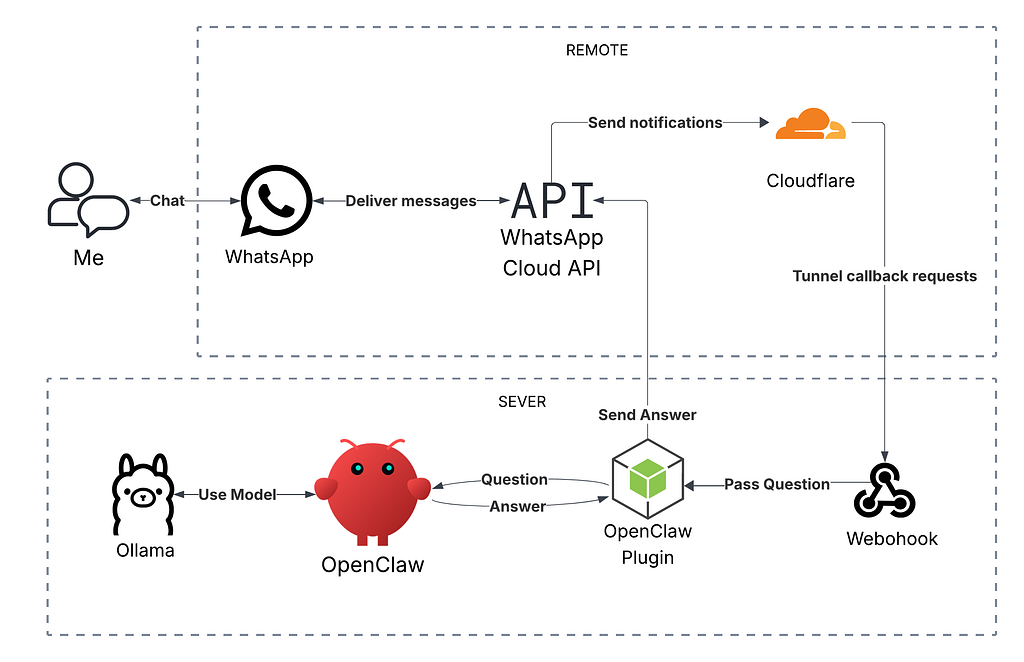 Request/Response Flow between OpenClaw and WhatsApp
Here is how it works:
- You send a message on WhatsApp
- WhatsApp sends a notification to a webhook running on your server through the tunnel
- The webhook passes the message to your plugin to process and pass to the OpenClaw agent
- The agent processes replies to the message and passes the answer back to the plugin
- The plugin then communicates with the WhatsApp Cloud API to send you back your response
Step-by-step Guide
Step 0 (One-Time Setup): Create a WhatsApp Business Account
From the Business Settings, create a new WhatsApp account if you don’t have one:
- Select WhatsApp accounts from the sidebar
- Click the + Add button in the top-right corner and select Create a WhatsApp Business account
- Enter a display name and select a category, e.g., Other. Make sure the display name aligns with the guidelines
- Select Use a display name only and click **Continue —**WhatsApp will create a virtual number for you
- Select the new WhatsApp account
- Select the Phone Numbers tab
- Click the created phone number to open the Phone Profile
- Copy the ID and store it in a secure place to use later
Step 1: Create a Meta app & Connect WhatsApp Business account
From the App Dashboard, create a new Meta app if you don’t have one:
- Click on Create App
- Enter the app name and contact email
- Select Connect with customers through WhatsApp use case
- Select an existing Meta Business Portfolio or create one
- Review details and click Create app
- Select the app from the App Dashboard
- Expand App settings near the bottom of the sidebar and select Basic
- Show and copy the App secret and store it in a secure place to use later
- Select Use cases from the sidebar
- Select Connect with customers through WhatsApp and click Customize
- In the API Setup section, select the WhatsApp Business Account
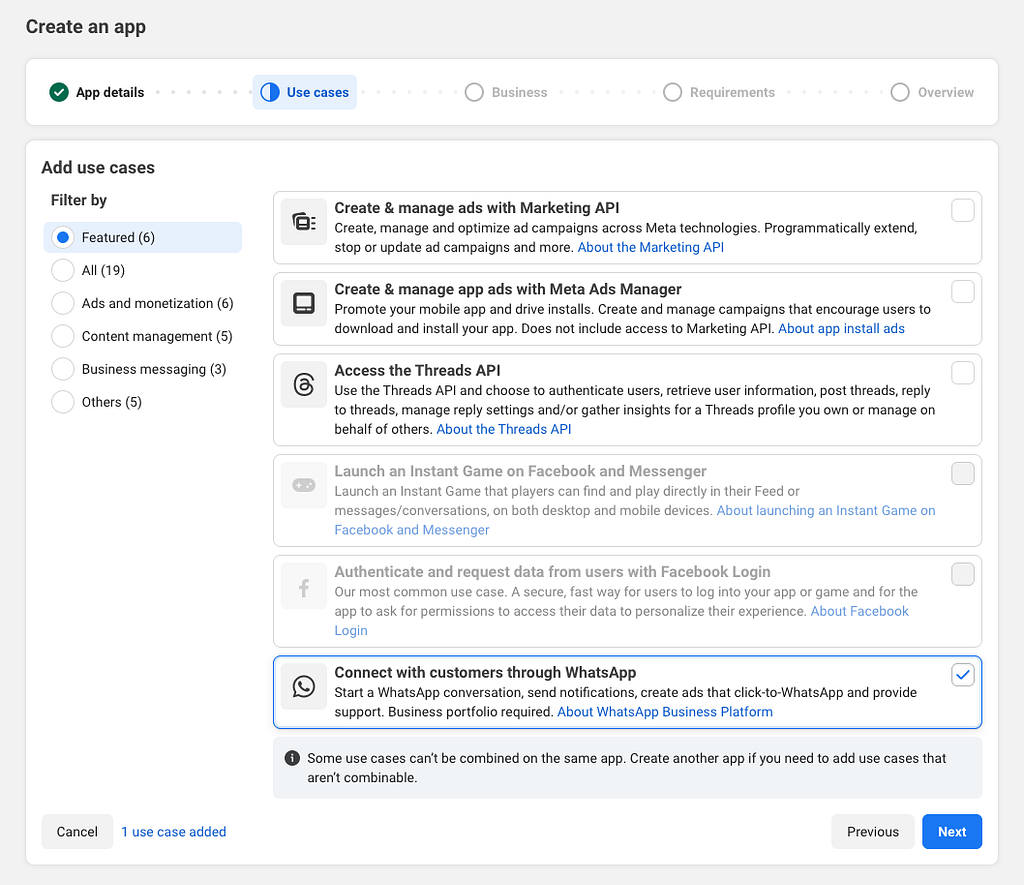 3. Select Connect with customers through WhatsApp use case
Step 2: Generate an API Access Token
From the Business Settings:
- Select System users from the sidebar
- Click the + Add button in the top-right corner to create a system user
- Enter the name for the system user and select a role
- Select the new system user and click Assign Assets
- From Apps, select the app and toggle Test app
- From WhatsApp accounts, select the account and toggle Everything
- Click the Assign assets button
- Click the Generate token button to generate the API token
- Add the following permissions to the token: whatsapp_business_messaging and whatsapp_business_management
- Copy the token and store it in a secure place to use later
Step 3: Set up a tunnel to your server
I am using CloudFlare for that, but feel free to use whichever setup you prefer. On your server, run:
cloudflared tunnel --hostname <your-subdomain> run --url tcp://localhost:3100
You can also do the same from the CloudFlare dashboard under Zero Trust → Networks → Connectors
Make sure you have the CloudFlareIP list added to the trustedProxies of the OpenClaw gateway. The gateway object of the openclaw.json should look something like this:
"gateway": { "port": 18789, "mode": "local", "bind": "loopback", "controlUi": { "allowedOrigins": [ "${ALLOWED_ORIGIN}" ] }, "auth": { "mode": "token", "token": "${OPENCLAW_GATEWAY_TOKEN}" }, "trustedProxies": [ "173.245.48.0/20", "103.21.244.0/22", "103.22.200.0/22", "103.31.4.0/22", "141.101.64.0/18", "108.162.192.0/18", "190.93.240.0/20", "188.114.96.0/20", "197.234.240.0/22", "198.41.128.0/17", "162.158.0.0/15", "104.16.0.0/13", "104.24.0.0/14", "172.64.0.0/13", "131.0.72.0/22" ], "tailscale": { "mode": "off", "resetOnExit": false }, "nodes": { "denyCommands": [ "camera.snap", "camera.clip", "screen.record", "contacts.add", "calendar.add", "reminders.add", "sms.send" ] } }
Step 4: Install and configure the OpenClaw WhatsApp-Cloud plugin
I am using this unofficial OpenClaw WhatsApp plugin: openclaw-whatsapp-cloud-api. It is a TypeScript app that communicates with the WhatsApp Cloud API. If you prefer, you can actually build your own by following the instructions here.
To install the plugin, use these commands:
cd ~/.openclawmkdir plugins && cd pluginsgit clone git@github.com:mcostantino-dev/openclaw-whatsapp-cloud-api.gitmv openclaw-channel-whatsapp-cloud openclaw-whatsappcd openclaw-whatsappnpm install && npm run buildopenclaw plugins install -l .
Note: the above commands are slightly different from the ones on the repo
Now, let’s configure the plugin using environment variables:
cd ~/.openclawnano .env
Copy and paste these values into your .env file:
# WhatsApp Cloud APIWHATSAPP_PHONE_NUMBER_ID=WHATSAPP_ACCESS_TOKEN=WHATSAPP_APP_SECRET=WHATSAPP_VERIFY_TOKEN=WHATSAPP_WEBHOOK_PATH=/webhook/whatsapp-cloudALLOWED_PHONE=
Fill the values in the file with the following:
- WhatsApp Phone number ID: the phone number ID from step 0
- WhatsApp App Secret: the app secret from step 1
- WhatsApp Access Token: the token from step 2
- WhatsApp Verify Token: any string you prefer to use as a verify token
- Allowed Phone: your phone number
Next, open the openclaw.json file and update the whatsapp-cloudfields so the file looks like that:
"channels": { ... // other channels here, if any "whatsapp-cloud": { "enabled": true, "phoneNumberId": "${WHATSAPP_PHONE_NUMBER_ID}", "accessToken": "${WHATSAPP_ACCESS_TOKEN}", "appSecret": "${WHATSAPP_APP_SECRET}", "verifyToken": "${WHATSAPP_VERIFY_TOKEN}", "webhookPath": "${WHATSAPP_WEBHOOK_PATH}", "webhookPort": 3100, "dmPolicy": "allowlist", "allowFrom": [ "${ALLOWED_PHONE}" ] }}, ... // other objects here, e.g., gateway, skills, etc."plugins": { "load": { "paths": [ "~/.openclaw/plugins/whatsapp-cloud" ] }, "entries": { ... // other plugins here "openclaw-whatsapp-cloud-api": { "enabled": true } } }
Finally, restart the OpenClaw gateway
openclaw gateway restart
You should now have a webhook listening on port 3100 for WhatsApp Cloud API callback requests
Step 5: Configure the webhook
From the App Dashboard:
- Select the app
- Select Use cases from the sidebar
- Select Connect with customers through WhatsApp and click Customize
- Select Configuration
- For the Callback URL, enter https://<your-subdomain>/webhook/whatsapp-cloud
- For the Verify token, enter the verify token you chose in step 4
- The API verifies your webhook, then shows a list of webhook fields
- Under Webhook fields, enable messages
Step 6: Test the connection
Open WhatsApp on your phone, search for the WhatsApp business phone number, and start chatting. Your OpenClaw agent should respond to you. Enjoy!
Troubleshooting
OpenClaw gateway failing to start
Make sure openclaw.json has no issues. Run the following command to check:
journalctl --user -u openclaw-gateway.service -f
It should give you a list of issues in the file.
Tunnel not connecting
Make sure the webhook is listening on your server on port 3100 using this command:
netstat -tap tcp | grep 3100
You should get something like:
tcp6 0 0 [::]:3100 [::]:* LISTEN 123456/openclaw-gat
Webhook verification failure
Make sure your callback URL is reachable from the internet. Try running this command on your local:
curl "https://<your-subdomain>/webhook/whatsapp-cloud?hub.mode=subscribe&hub.challenge=123&hub.verify_token=<verify-token>"
Remember to replace <your-subdomain> and <verify-token>with your values. You should get 123 back
References
- OpenClaw documentation
- WhatsApp Cloud API Get Started
- WhatsApp Business Accounts documentation
- CloudFlare Tunnel Documentation
- OpenClaw WhatsApp Plugin (unofficial): mcostantino-dev/openclaw-whatsapp-cloud-api
You should now have a fully functioning WhatsApp number for your OpenClaw agent, running securely through your own tunnel without third-party fees. What kind of AI agent are you building with OpenClaw? Let me know in the comments below! If you run into any issues during setup, drop a question, and I’ll help you troubleshoot.
Self-Host an AI Agent Using OpenClaw and WhatsApp Cloud API (2026) was originally published in Capsulat on Medium, where people are continuing the conversation by highlighting and responding to this story.